Friday, September 28, 2018

P4P raglan hack


A Star Wars Tunic type top:
I stared with a patterns for a raglan shirt. (patternsforpirates slim fit raglan)

I cut the front bodice piece on the fold og my pattern tracing paper so my pattern piece would be the full front bodice:


I laid my 2 intended fabrics together and had my son edit them on his computer to give me an idea what it'd look like:


What My son did with my pictures:


I decided I liked it and wanted a tunic length.
I didnt take many pics along the way, so I will try to describe it well:

1. I cut out the Panel using the front bodice pattern piece, after holding the fabric up to me to see where I wanted the picture to be and then lining the pattern up with that.

2. I then used my straight edge and rotary cutter to cut the desired angle (keeping seam allowance in mind)

3. Lay the front bodice piece (it has the angle cut now) on top the multi-character fabric to make ure the pattern is even and in the correct space.
4. lay the pattern piece on top of the front bodice (that is on the skirt fabric).

5 cut the skirt to match up to the angled bodice. I started cutting 1 inch above the lower edge og the bodice on each side (which are different heights due to the angle)
 I cut down the rest the bodice side seams, extended it down, and faired out a bit, around 6 inches (to make it tunic length)

*at this point I just cut the lower edge straight across, as I wasnt sure how I was going to finish it.

6. I cut out 2 mirrored squares of fabric, large enough to be my pocket. (you might need a slightly bigger square to accommodate the angle.)

If you dont know how to do the inseam pocket, try this link. It's basically what I did, but instead on 2 waistband sections I sewed the pocket sections to the top and the bottom making them liked up:


7. Then I did the raglan like normal. and cut my hem at an angle.


Monday, June 18, 2018

Flowy Fun

Made a flowy, cool skirt today. It's so hot outside. I think the temperature and humidity must be about the same. 95. (Fahrenheit) 


I love attaching 'under-shorts' to my skirts!  they make the skirts more comfy! loose and flowy skirts but still a held-in snug feel that I like. A touch of modesty and the keep sweaty summer thighs from sticking together, giggles.
*Skirt Fabric is ITY from SoSewEnglish. The shorts are made of Power Mesh from PheeFabrics. The skirts is just a made up pattern, the shorts are PegLegs from Patterns for Pirates (a free pattern)


Yesterday I wore a fun Bicycle dress I made last year. This dress is filed under FEMSICAL!


*Bicycle Fabric from Fabric.com, 2 years ago though


I think I might post what I wear when it's Made by Me, more often.  For myself. I kinda have a lot of things I made and I wat to make sure everything is getting worn! (I get into clothing ruts)

Wednesday, April 18, 2018

Feelin' Drapey! NoPantsApril 2018 Days 16/17/18

day 18:
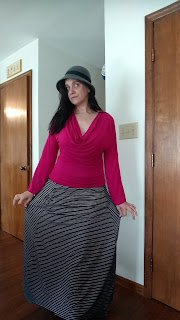
Drapey Sleeveless Blouse (MBM - madebyme)
3 Panel red maxi skirt with front seam pockets (MBM)
Grey cropped cardigan (MBM pattern by Patterns for Pirates)
Hat- inherited from my husbands grandfather
Setting: the warehouse where I work while I waited for my area to get past 56 degrees.
LEGO earrings are my whimsy today. FEMSICAL for the WIN!


 AND,  those striped flats from Goodwill are making many appearances this month~

and, the fancy-pose:


I didn't get good pictures Sunday. (day 17) I tried, but used a timer and didn't check to see if anything turned out.


Wasn't sure I would like the flouncy sleeves, but I do. They re short enough to not get in my way.

Day 16: I didn't get good pictures, but didn't even try. I took 1 picture as an example for sport skirt styles.
I wore a workout skirt over leggings, and a tank top. Only the Skirt was MBM.


Sunday, April 15, 2018

NO PANTS on me! No Pants April days 14 & 15

NO PANTS APRIL is going strong! 

Day #14 had me thinking I might want to workout, but not enough to change into workout clothes, so I just started the day this way


and ended the day that way.

and never worked out.

It's an odd picture, but I actually took the picture to show someone the particular style of workout skirt.

I did better with Sunday pictures.

My hat with a flower clipped on the band.
My LuLaRoe Cardigan, that seems to match almost everything!
And Made-by-me, softer-than-L.L.R. skirt. It is a circle skirt cut in the shape of a square, with rounded corners.


The WHIMSY in my Femsical ... handmade mushroom earrings:


sitting in church, my cardigan ties looked kinda like a rabbit...


I like these ($5 Goodwill) shoes more than I thought I would!  I almost always wear solid color shoes, wasn't sure if these stripes would work, but they were comfy flats. 


Trying to look artsy-fartsy

Persephone the Floof! 

IN OTHER NEWS:
I made a cami-tank for a friend:


I hade some extra Dem Bones fabric ( So Sew English Fabrics ) from my Sunshine Dress, so I made her this fun top!

I read an article, about how to write a blog, to attract readers. I do almost everything wrong.  It sounds like too much work.


Oh, I have some videos for Friday the 13th NPA, but am trying to figure out how to get them here. (My phone doesn't want to email them, I might have to upload them to youtube)

Tuesday, April 10, 2018

belted NPA2018 weekend

DAY #10 of No Pants April. It was Casual today. Just little ol me all alone at the warehouse. Tunic-top & leggings. But I added a belt to bring this combo up from 'sloppy-leisure' (for the whimsy part of my femsical, I wore earrings my brother made me from the resistors in his old computer)

I rarely wear belts. no matter the style, they seem to hit me at an odd place and make me think I look cut in half. tis one with the little swoop looks less cut-in-half. (and you do not see the coffee spots on my shirt. I thought it was water so didn't do anything about it as I was walking out of the house)


if it were NOT No Pants April, this outfit would have been the very comfy, yet sloppy outfit you see below...


It was a bit chilly in the warehouse, so I used the belt to keep my cardigan wrapped around me.

I know. I know.
 this is barely acceptable for No Pants April, I just made it my thr skin of my teeth.

Here are pictures from the weekend. (I had a headache all weekend and didn't get to blogging, I didn't even get a Saturday Picture)

Saturday: this skirt with a light grey blouse and my grey cloche hat with a red flower. Awesome earrings made from seashells.

Sunday: I wore BONES! this was my church outfit. I don't need to point out the whimsy here. I love that the lady at church told me how lovely I looked. (she must not have looked closely enough, but wearing hats fools everyone into thinking I'm fancy)

After church my headache got worse and I slept most the day.

Monday, I got up late (still headachey), got dressed for NPA2018, brushed my cat, made a to-do list, headache got worse and I went back to bed for the rest of the day. Here is the brief 30 minutes the Excedrin was working:


I need to cover my greys.

And wear make-up.

And lift weights.

How's your NoPantsApril going??


Friday, April 6, 2018

Draped Dolman! [NPA2018]


I have made draped necklines. I have made dolman sleeves. I wanted BOTH in one top. So I made this:


The above pictures are not hemmed, yet.

Here's how it was made...

like normal, place the BACK pattern piece places on fold. (check out my Draped Neckline tutorial here)


Cut a curve for the dolman armpit and used my straight edge ruler for the sleeves


 For the top, I measured my 13" to fold over for the drape:
 see, the 13" folded over......

 then I fold the fabric in half lengthwise:


  And cut my spliced front bodice to form drapes (check out here for more details on making draped necklines)

adding sleeves in a similar method as the back:


this is the front with the folded-over drape Unfolded. I cut the sides to line up with the shoulder deam area:


 see how when re-folded the drape fold over lines up with the arms: this is so the fold over doesn't bulk up the sleeves.

next, I measure the BACK neck opening.

 and cut a 2" strip that is 85% of the neck. (my neck measured 10", so I cut a 8.5" strip)


and here is the front and back lined up- see the extra folds? it will look bunched up.

 I pin the neckband, matching edges and center. You will have ti stretch the band slightly as you sew.


Finished: it looks pulled a bit, but will be good when all sewn together:


and just to show you the odd shape piece you will have. Here is the front with the drape section unfolded:


I matched the back neckband with the drape. the fold over part 

here is the back neck pinned on both sides.  I then sewen the upper arm seam.

I used the stretch stich on my regular machine, I didn't want the cut edge the serger makes.


here it is. right sides together (inside out). top seam stitched and drape folded over and pinned in place: 


see how I put the lower edge of the fold-over along the underarm seam? that will keep the drape in place. 


STIRCH the top shoulder seam part to the already sewn shoulder seam- to hold it in place. I used a 3.5" stitch length.


then sew the underarm-side seam- catching the fold-over drape in the armpit area.


my arm lengths were off. no big deal- just trim them to the same length if you forget to measure your pieces before you cut them out:


this is wha I wore all day. in the warehouse where I work. I realized my drape was a bit deep. So I will add a lace insert....


OOPS!!
While trimming some strings and getting ready to hem my sleeves..... I snipped the arm fabric!!!! AGGGHHH!!!!


I cut off both arms at the length of my OOPS and added a flounce. I think I fixed it. and I found a lacy tube top bra thing to wear under the drape.


LinkWithin

Related Posts with Thumbnails